

Safety is priority number one when it comes time to hitching or unhitching your travel trailer. Hitching especially is something you want to pay close attention to every time. If you do it wrong, you run the risk of completely destroying your trailer. Do it correctly and you should have nothing to worry about as you head down the road.
If you haven’t already, be sure to shop around for a safe and functional trailer hitch system. Trailer hitches have come a long way and come built-in with many modern safety features that your factory set up might not include.
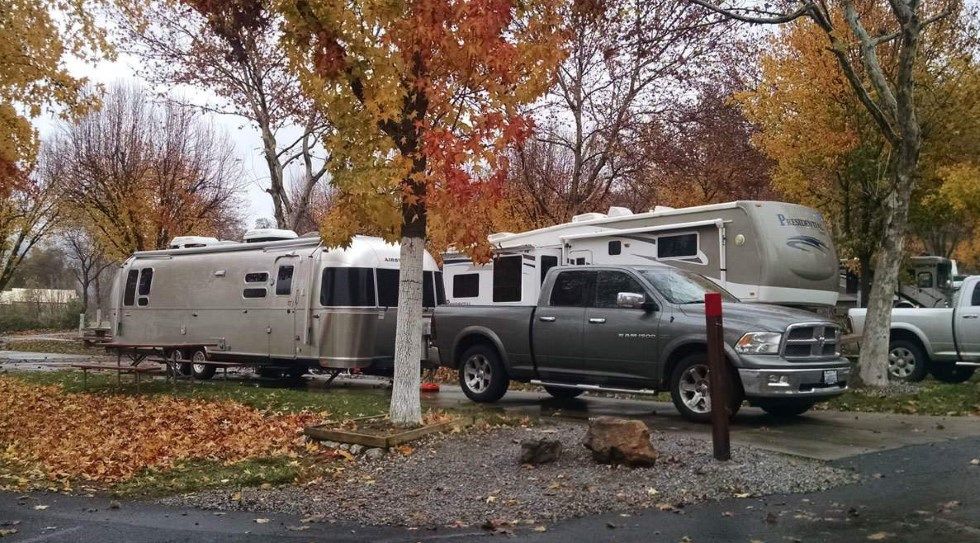
I’ve been hitching and unhitching our Airstream trailer for two years of living on the road. In that time, I’ve learned a lot about what works and what doesn’t work. I haven’t made all the mistakes, but I’ve made a few, so I can speak from experience. All of the examples here are for travel trailers specifically. I am not an expert in fifth-wheel RVs, though many of the general tips will still apply. Even if you do have a travel trailer, the setup and hitch may be a bit different from our Airstream. Get what you can from this, and always make sure to read the owner’s manual on all your equipment for proper use and maintenance.
Oh and if you’d like to see what RV best fits you – check out our guided search here.
Travel Trailers For Rent Near You
Preparation and Supplies for Hitching and Unhitching a Trailer
Like every aspect of travel trailer towing, hitching and unhitching safely depends partly on being prepared ahead of time. The first step is to study up, and you are already doing that by reading this article!
Your Trailer Towing Checklist
Checklists are helpful anytime when safety is a serious concern. The purpose is to ensure that everything is done correctly, every time. Pilots know exactly what they should do for pre-flight, but that does not mean that they will always remember. Checklists ensure that mistakes don’t happen (assuming that you actually use them).
For this reason, I strongly suggest you create and use a physical checklist that covers the essential steps in hitching and unhitching your trailer. Chances are, you won’t use it every time, but each time you make a mistake, you will think “Wow, I really should have used my checklist.”
It is actually best if you write this checklist yourself. That way you tailor it to your needs so that it has only the essentials that matter. It will also follow the order of activities that you need to do for your specific rig.
My favorite way to do a checklist is a laminated sheet of paper, but if you prefer a digital copy, there are many programs you can get for a cell phone that also works as well.
Trailer Towing Supplies
Before you get started, there are a few things that you should have with you to make the job a little easier.
Proper Lubricants
Keeping your equipment lubricated according to the manufacturer’s recommendations is very important. I keep two types. I use a can of W-D-40 spray lubricant to lubricate the jack on the front of the trailer. And a classic grease gun with high-friction grease to lubricate the hitch ball and ball receiver. We use both every time we hitch up.
An Apron or Towel
Because you are working with lubrication, you want a way to wipe off your hands. Otherwise, stuff gets messy and more importantly, slippery.
I like an apron because it protects my clothes, and I can use it to wipe my hands off.
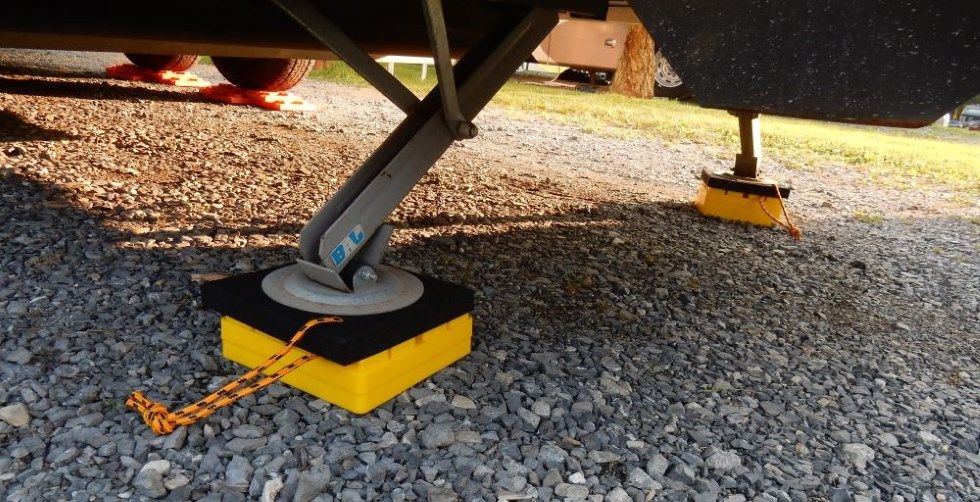
Rubber Blocks
These are something I didn’t discover until after we’d had a rather scary accident while unhitching.
These rubber blocks offer the best traction between your trailer jack and the ground.
That means there is less chance the trailer will slip off the blocks and come crashing down. They are also good for use with your stabilizers.
Duct Tape
You want a good sturdy duct tape that will stand up to moisture and grease.
The purpose of the tape is two-fold. First, you can use them to mark the correct chain links on your sway control arms. Second, you can mark all your hitching tools with tape, so you don’t lose them.
Hitching
Time to get hitched! It can be a little intimidating at first, but with practice, it’ll come easier. Shop for a modern hitch system to make it even easier.
Take your time, focus on what you are doing, and get it exact and correct every time. Here’s a helpful video from Fraserway RV to get you started.
Before You Hitch
- Make sure your vehicle is fueled up
- Use the bathroom
- Turn off your refrigerator, AC, and other appliances
- Disconnect all your utilities
- Close and secure all the windows, vents and hatches
- Close and secure all your awnings
- Put away any antennas you have
- Secure the contents of your trailer
- Move everything you need for your trip to your tow vehicle
- Close and lock the trailer door
- Raise your steps
- Raise your stabilizers
- Ensure your wheel chocks are in place and snug up to the wheels
Most of these steps protect your trailer from damage in transit or during the hitching process. Before you start hitching, go over this list and make sure everything is checked off.
Ready the Trailer Connection
Prep the trailer with these steps:
- Remove your hitch lock, if you have one
- Flip-up the receiver latch into the vertical open position
- Use your jack to raise the front of the trailer up
- Lubricate the jack piston while it is extended
If you feel the trailer shift while raising it, stop immediately, and go check your wheel chocks. Their job is to keep the trailer from moving around while you get it hitched.
Getting the Hitch on the Tow Vehicle
Your hitch is heavy. That’s a good thing, though, because it means that it is also sturdy. However, this can also make it a bit of a hazard for you. I do a few things to compensate for this in order to protect my back.
- I keep my hitch in a plastic tub with handles, so it is easy to store and move around
- Whenever lifting, I keep my back straight, my torso aligned with my feet, and use my knees to raise and lower myself
- I wipe any grease off the hitch where I will be grabbing it, so it does not slip
- I have a tennis ball split down the middle, which I place over the hitch ball to keep the grease from getting on my clothes, hands or arms
- My shoes have decent toe protection, just in case I should lose my grip
I take my hitch out of the truck in its tub and place it close to the hitch receiver. I close the truck gate. I then squat down, get a good grip on the hitch, lift it into position, and slide it gently into the hitch receiver.
My hitch has removable sway control arms. I actually didn’t discover this for more than a year of hitching. Removing the arms not only makes it lighter but also easier to maneuver. This is why you should always read the manual for your gear! You may learn something very useful.
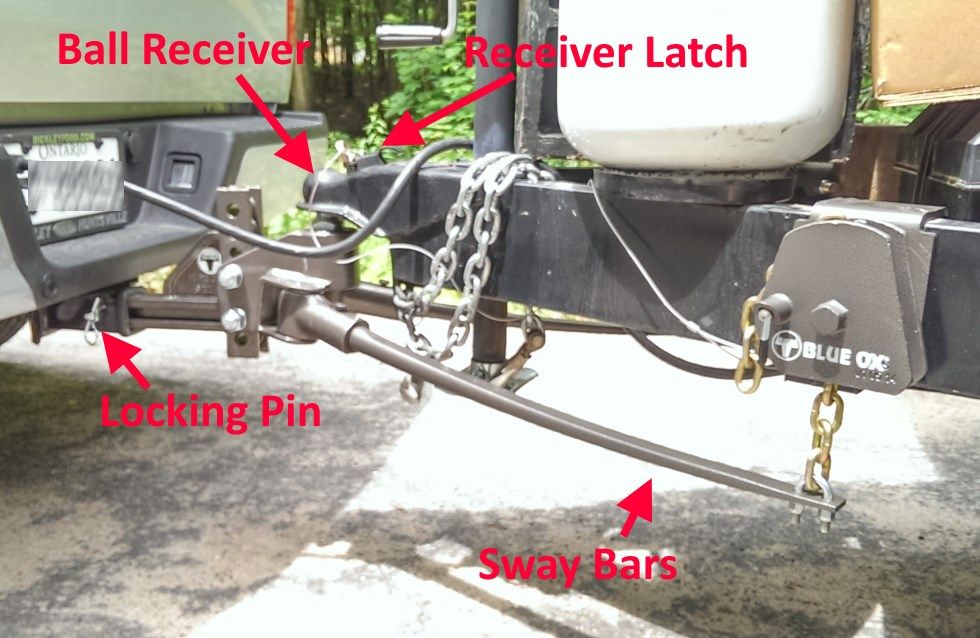
The Linch Pin
Now comes the MOST IMPORTANT STEP OF ALL. You must insert and secure your hitch locking pin.
You want to make sure that it is 100% secure. I like to use one that specifically has a lock on it so that there is no doubt.
If you forget this, then you can have your trailer fall right off your tow vehicle while you are cruising down the highway. That could result in a catastrophic accident.
After you have the pin in, go ahead and get your grease gun out and make sure the hitch ball has a little fresh grease on it. If you see chunks of stuff on there, go ahead and clean off the hitch ball, then apply fresh grease.
Link the Tow Vehicle to the Trailer
Your hitch is on and your trailer is prepped and raised! It’s time to connect the two. My wife normally helps me with this process by acting as a spotter. I have done it on my own, but it typically takes longer.
I use the backup camera on my truck to slowly back into position. Try to back up as squarely with respect to the trailer as you can. Being at an angle can make hitching a bit more difficult.
I’ve learned that, because the camera is off to one side, I have to line things up just a little askew in the view for it to be in the right spot. My wife uses a two-way radio to let me know if I missed the mark and what I need to do to correct it.
Once I have it, she lowers the trailer while I press the brake on the truck so the truck doesn’t shift out of position.
When you are all done, be sure to engage the safety brake and turn off the engine. You don’t want anything moving around during these next steps.
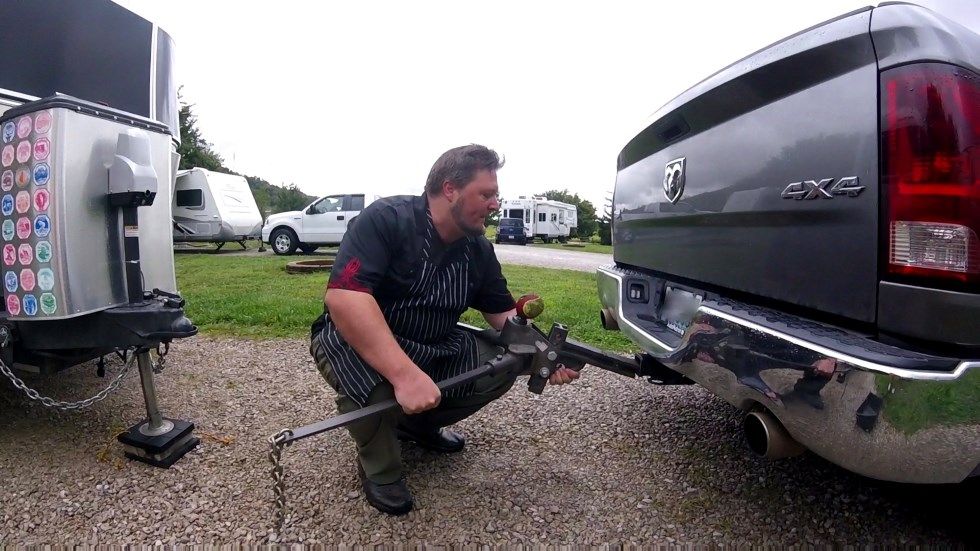
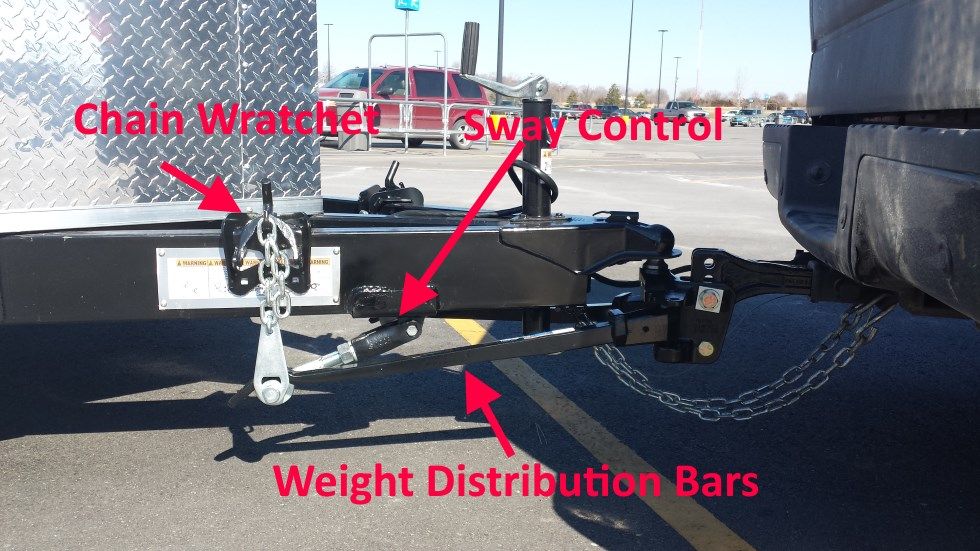
Attach the Sway Bars
All but the smallest trailers should have a hitch with sway control bars and/or weight distribution bars. These create tension in the connection between the trailer and the tow vehicle to help evenly distribute the weight across the two.
They also provide some resistance to keep the trailer from swaying side to side in the wind while you tow. Both features make it much safer to haul.
My sway bars attach to the trailer via chains that are ratcheted into place. When I had the hitch installed, the dealer determined the correct amount of links I needed to attach before locking them into place.
So that I never forget which ones to do, or count incorrectly, I’ve wrapped neon yellow tape around those links. I attach my sway bars before I completely lower my trailer onto the hitch. The lower you take it, the harder it is to get the sway bars ratcheted into place.
Lower the Trailer and Close the Hitch Ball Receiver
With your sway bars on, lower the trailer down until the hitch ball is fully inside the ball receiver. Then, flip the receiver latch closed, locking the ball in place. Much like the hitch pin, if you don’t do this, a big bump could de-couple the hitch and lead to an epic disaster.
At this point, you can raise the jack all the way up and remove your jack blocks. This is a great time to clean the jack blocks and the bottom of the jack foot.
The lubrication you use on the jack piston can dribble down and make both slippery. That is a very bad thing as it could lead the jack to slip off the blocks when un-hitching. I know this from first-hand experience.
So, wipe both off at this stage with a towel. Check to make sure there is appropriate tension on the sway bars.
Hook Up Your Brakes and Lights
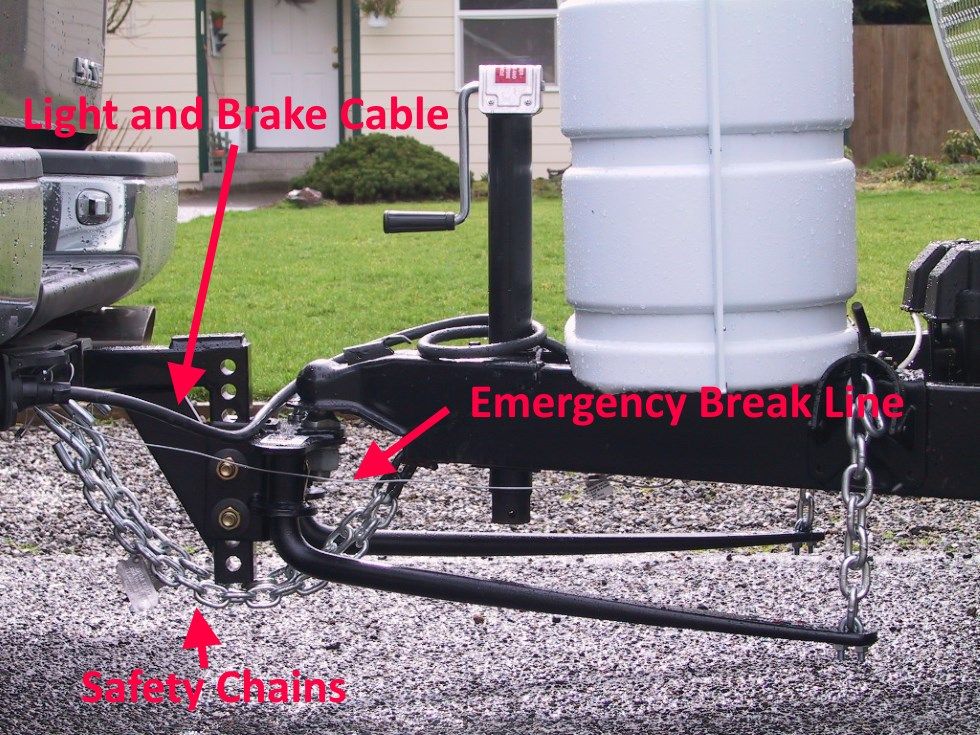
Connect your brake and light cable. This is how your tow vehicle sends brake and light signals to the trailer while you drive. You need to make sure it is well seated. I like to blow out any dust from the cable before attaching it to reduce corrosion and wear.
Next up is the emergency brake release. This device attaches to the safety chain loops on the hitch receiver of your tow vehicle. Its job is to automatically engage your trailer brakes if the tow vehicle and trailer should become separated. It is not there to save your trailer so much as to keep it from barreling down the highway and smashing into other vehicles.
Connect Your Safety Chains
These are your last line of defense in keeping your trailer attached to your tow vehicle. If the hitch receiver or ball receiver should fail or you forget to lock them, these chains are supposed to keep the trailer connected to your vehicle.
You want to make sure these are not dragging on the ground, but keep in mind that twisting them up reduces their tensile strength. Ideally, you want safety chains that are just the exact length you need so that they remain hanging a bit loose, but not touching the ground.
Final Steps
Now that you are all hooked up, you can go ahead and remove your wheel chocks. If you forget this, you may find yourself strangely immobile when you go to leave.
While removing the chocks do a final check around the trailer to make sure you didn’t miss any open windows, latches, or forget any camping gear you might have had out.
Once that is done, it is time for light checks. You need to make sure your brakes, running lights, and turn signals are all working before you head out. If the trailer lights don’t work, you need to check the light and brake connector to make sure it is plugged in properly.
At this point, you are ready to start rolling out.
Always start out slow to avoid hitting anything. Before you leave your RV park or campground, give your brakes a test to make sure the brake controller is dialed in nicely. You want the trailer to be tugging just a bit as you come to a full stop.
I often find that the weather can change how the trailer and tow vehicle brakes are performing, so I always do a live test and make any needed adjustments to the brake controller settings.
With that done, it’s time to hit the road in high confidence!
Unhitching
The good news is that unhitching is a lot less danger-prone than hitching. Nonetheless, there are a few things to pay close attention to. Here’s a handy video from Silver Lining Day Dreams.
Getting Situated
Once you are parked, your first order of business is to get your wheel chocks on and make sure they are snugly fit. You really don’t want your trailer moving around while unhitching. Putting chocks on both sides of the trailer is best.
Before you lower your jack, make sure the area under the jack is as flat as you can make it. Then, get your rubber pads down square on the ground under where the jack will come down. Make sure the pads are clean and dry.
Lower the jack down, making sure the foot is dead center on your pad. Run it just until the trailer just starts to lift up and pause.

Disconnecting
Now disconnect the brake cable, emergency chains, and emergency brake controller.
Once that is done, run the jack so it lifts the trailer high enough that the tension on the sway bars are low enough to uncouple them. A little tension is fine, but ideally, it should be minimal. If there is too much tension, they could send the chains whipping around when you ratchet them off.
Once the sway bars are free, lower the trailer such that you are sure it is putting some weight on the tow vehicle. Only then should you lift up the ball receiver lock to release the hitch ball.
Uncoupling
With the ball unlocked, use the jack to lift the trailer up and off of the hitch ball. Sometimes this is tricky because there is tension between the tow vehicle and the trailer that will cause it to lift up rather than come free.
If this happens, don’t lift it too high, you don’t want everything jolting around when it finally comes out. This can destabilize the trailer and possibly cause it to slip off the jack footings. I like to get one of my feet up on the hitch and gently push down, trying to free the ball.
You can also have someone get into the tow vehicle and carefully take it out of park to try and relieve the tension.
Once the trailer is free of the hitch ball, drive the tow vehicle forward and use the jack to get the trailer into a nice level position.
At this point, all you need to do is to carefully put your hitch away using the squat and lift method to avoid any injury to your back. Your back can be especially vulnerable after a long ride in the car, so be extra careful about it.
Safe Travels!
You now know all that I have learned about safely hitching and unhitching a travel trailer. Go forth, check out all our RVs for rent, and have wonderful adventures with one less thing to worry about on your next RV trip!
Travel Trailers For Rent Near You
This post contains affiliate links.